Let’s say that you are hiking in the woods from starting point “A” to destination “B.” You are only halfway to site B. It is a hot, still day. A few clouds are in the sky. While looking at your GPS, you notice that the barometric pressure is dropping dramatically, and in the distance you can see clouds that will be on you soon. You know that there may be a downpour coming, but you only have a few minutes to get ready. Oh, and you have two other people with you. You need a shelter for several people quickly.
Well, you tell the others not to worry and spring into action. Within a few minutes, you have a shelter prepared for everyone. You have set up a “Lean-To.”
The lean-to is a great quick shelter that consists, on the most basic level, of just a roof that angles up from the ground in one direction. It is open on 3 of 4 sides. A more detailed one may have 3 of 4 sides closed in.
They are great for very quick shelters if you have little time, or energy. The majority of them is not great for shielding wind and is not really meant for cold weather. The best thing about lean-tos is how quickly an emergency lean-to can come together.
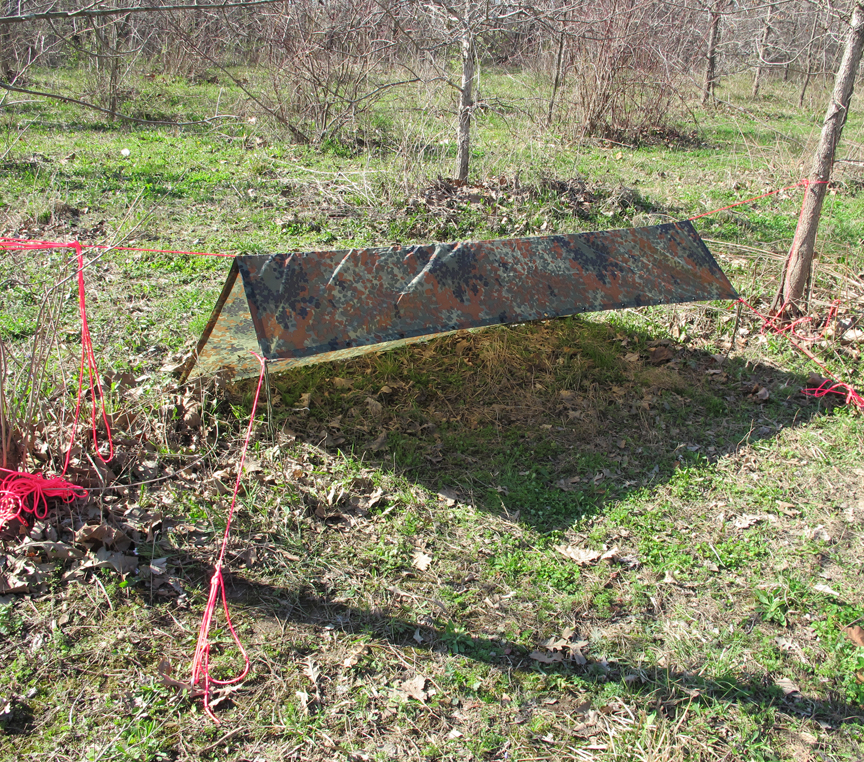
In an emergency, hopefully, you have your bug out bag or wilderness pack. If so, you will have a tarp or emergency blanket and some paracord. This is all that is needed for a lean-to. If using a tarp, you will be able to create a ridgeline lean-to like the photo above. But if you are using an emergency blanket because you weren’t prepared enough to have a small tarp, but was good enough to have an emergency blanket, then you can build a basic one like the photo below. I like the ridgeline because it is a little better at keeping the rain from blowing in, although neither is great for extremely windy scenarios.
I will tell you quickly how to set up a ridge line and the rest can be adapted from it. You will run a piece of cordage from tree to tree. Then drape the tarp over the cord. Fasten the bottom of the tarp to the ground so that the majority of it is on the ground side of the cord. Then fasten the other two corners using two extensions of cord and anchor the cordage to the ground. Now it should look like a letter “L” being hung by the corner of the L.
The emergency blanket can be affixed like this, or can run so that the two corners that wrapped over the cord, is actually just reaching the cord. You can affix the corners to the cord, or instead of the initial apex cord, you can just run cord from the corners to two different trees.
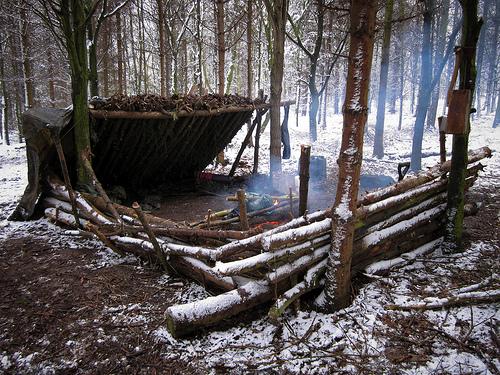
If you are unlucky enough to have too much wind, or not have your 72 hour emergency kit on you, you can find vines (or cord) and such to tie a log to two trees, creating the top beam of the shelter. Then run several smaller branches down at an angle from the main beam to the ground. You can cover this with a tarp, blanket, poncho, or plenty of pine and spruce branches. On top of the pine and spruce branches (the insulation) you will place more broadleaf branches. You want the top leaved branches to overlap on top of the lower branches, so the water will run down, instead of soaking into the shelter. To provide more stability, you can secure the angled branches with smaller cross-members made from securing smaller branches perpendicular to it, or if you find lots of flexible branches, you can forego the tying (and cordage waste) and just weave it between the branches.
If this shelter was built twice, facing each other and seemingly attached to the top (like a tent or a frame shelter) it will guard better against wind and rain.
It is always important to place evergreen boughs on the ground, since you lose the most heat through the ground.
If you need a good takeaway, then listen up. Make sure you have a poncho, a tarp, an emergency blanket, and lots of paracord in your bug out bag. That will help you with MANY things in the wilderness.